For games with friends, create a private game and share the game pin with them from the lobby later on. Alternatively, create a public game by sliding the "Private game" slider off. Public games allow anyone to join your lobby before the game starts.
Viking Dominion: A strategy guide
Master the art of Viking warfare and strategy. From your first battle to ultimate dominion.
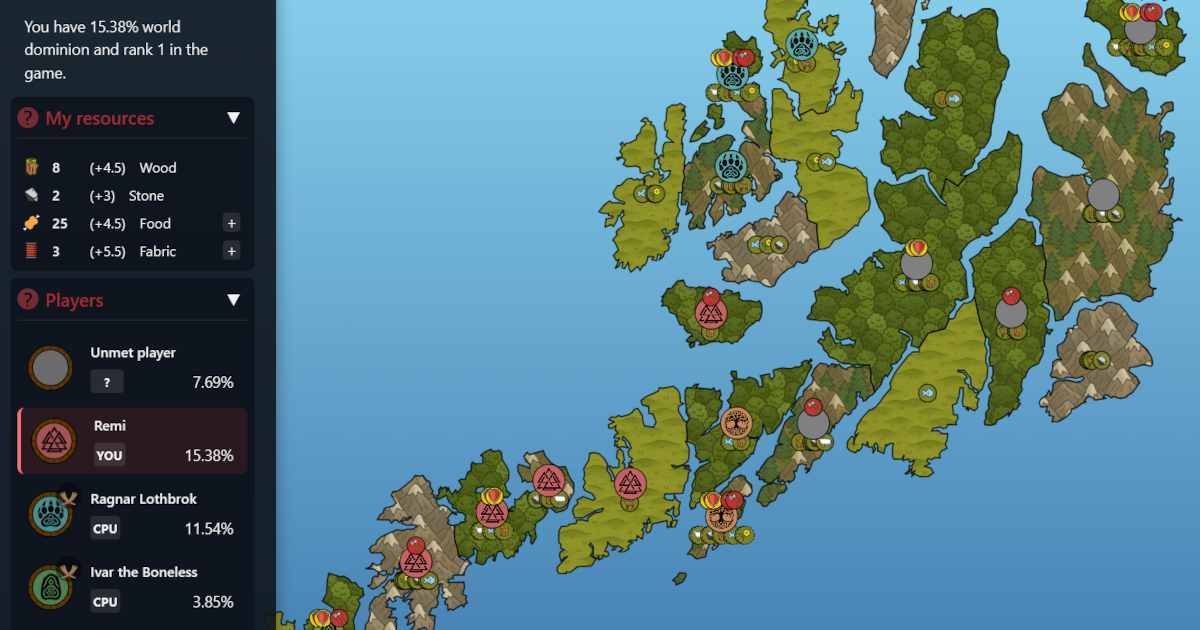
Table of Contents
Rules
In addition to obvious mechanics you can deduce from the gameplay, keep these special rules in mind:
Time limit: Every player has a limited amount of time to perform their moves. If you don't act before your timer expires, you lose the game.
Ragnarok: The game owner can invoke Ragnarok at any moment, which immediately ends the game. No winner is declared – but you get a sorted list from best to worst.
Quitting: You can quit at any time. If the owner quits, ownership passes to another human player. If no human players remain, the game ends.
CPU hostility: Attacking a CPU player gives you a bad reputation with that player, and it will be more hostile towards you for the next three rounds. This is in addition to the baseline hostility set by the game owner.
CPU autonomy: The CPU can do everything a human player can do, including attacking you, proposing alliances, and breaking alliances. The difficulty level adjusts how efficiently they harvest their resources, and the hostility level indicates the probability they attack other players or enter/break alliances.
Alliances: Regions controlled by your allies count towards your total when pursuing Viking Dominion. And - allies cannot attack each other!
Alliance proposals: If you propose an alliance you cannot attack that player the same round. If a player proposes an alliance to you, you must refuse it before attacking them during that round.
Breaking alliances: The side that breaks an alliance cannot attack during that round. The opponent can! Breaking an alliance with a CPU reduces the likelihood that the CPU will ally with you ever again.
Victory condition: Victory is determined at the end of each turn. A player or alliance that achieves Viking Dominion at that point wins the game.
Starting a new game
Choose your game type
When starting a new game, think about what kind of experience you want: solo practice, playing with friends, or facing challenging opponents?
Private vs public games
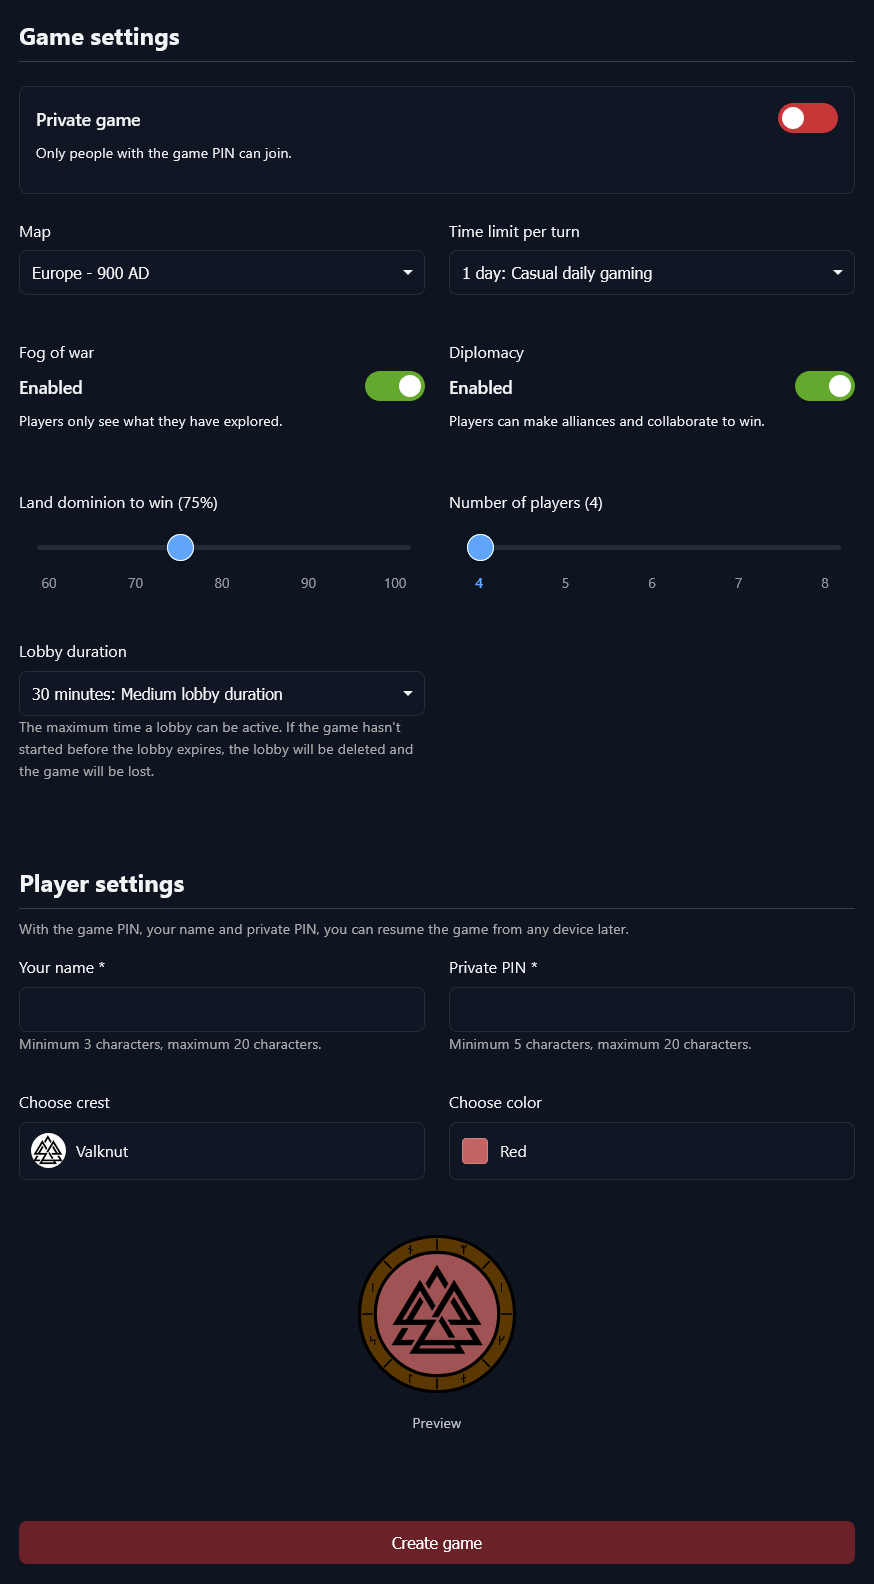
Game configuration
Choose your map
Europe offers a larger, longer strategic experience, while Lofoten provides shorter, more dynamic games that heavily emphasize longship warfare and naval strategy.
Set turn limit
Choose your pace: 1 day for casual play when you can't finish in one sitting, or as fast as 2 minutes for intense, rapid-fire games. Remember: if you don't click "End Turn" before the countdown finishes, you lose!
Fog of war
Enabled by default, Fog of war hides enemy starting positions and resource distribution. Disabling fog of war gives you strategic advantage compared to the CPU, by revealing the map layout, resource distribution and anonymized enemy starting positions.
Diplomacy
Diplomacy enables alliances for collaborative victory. Allies pool their territories toward Viking Dominion and cannot attack each other.
Land dominion
Land Dominion ranges from 60% to 100%. Lower percentages create shorter games, especially with diplomacy enabled. 80% dominion usually leaves no doubt about the winner, so anything above that is just to humiliate your opponents towards the end.
Number of players
Choose between 4 and 8 players total. All slots except one start as CPU players. When humans join later on in the lobby, they replace CPU players automatically.
Player settings
This is about you. Choose a name and a private PIN. Later, you can use the GamePin, your name and the Private PIN to resume the game from another device.
Finally, choose your family crest and your preferred color, and you're set. Hit Create game to start the lobby and allow other players to join.
Game start screen
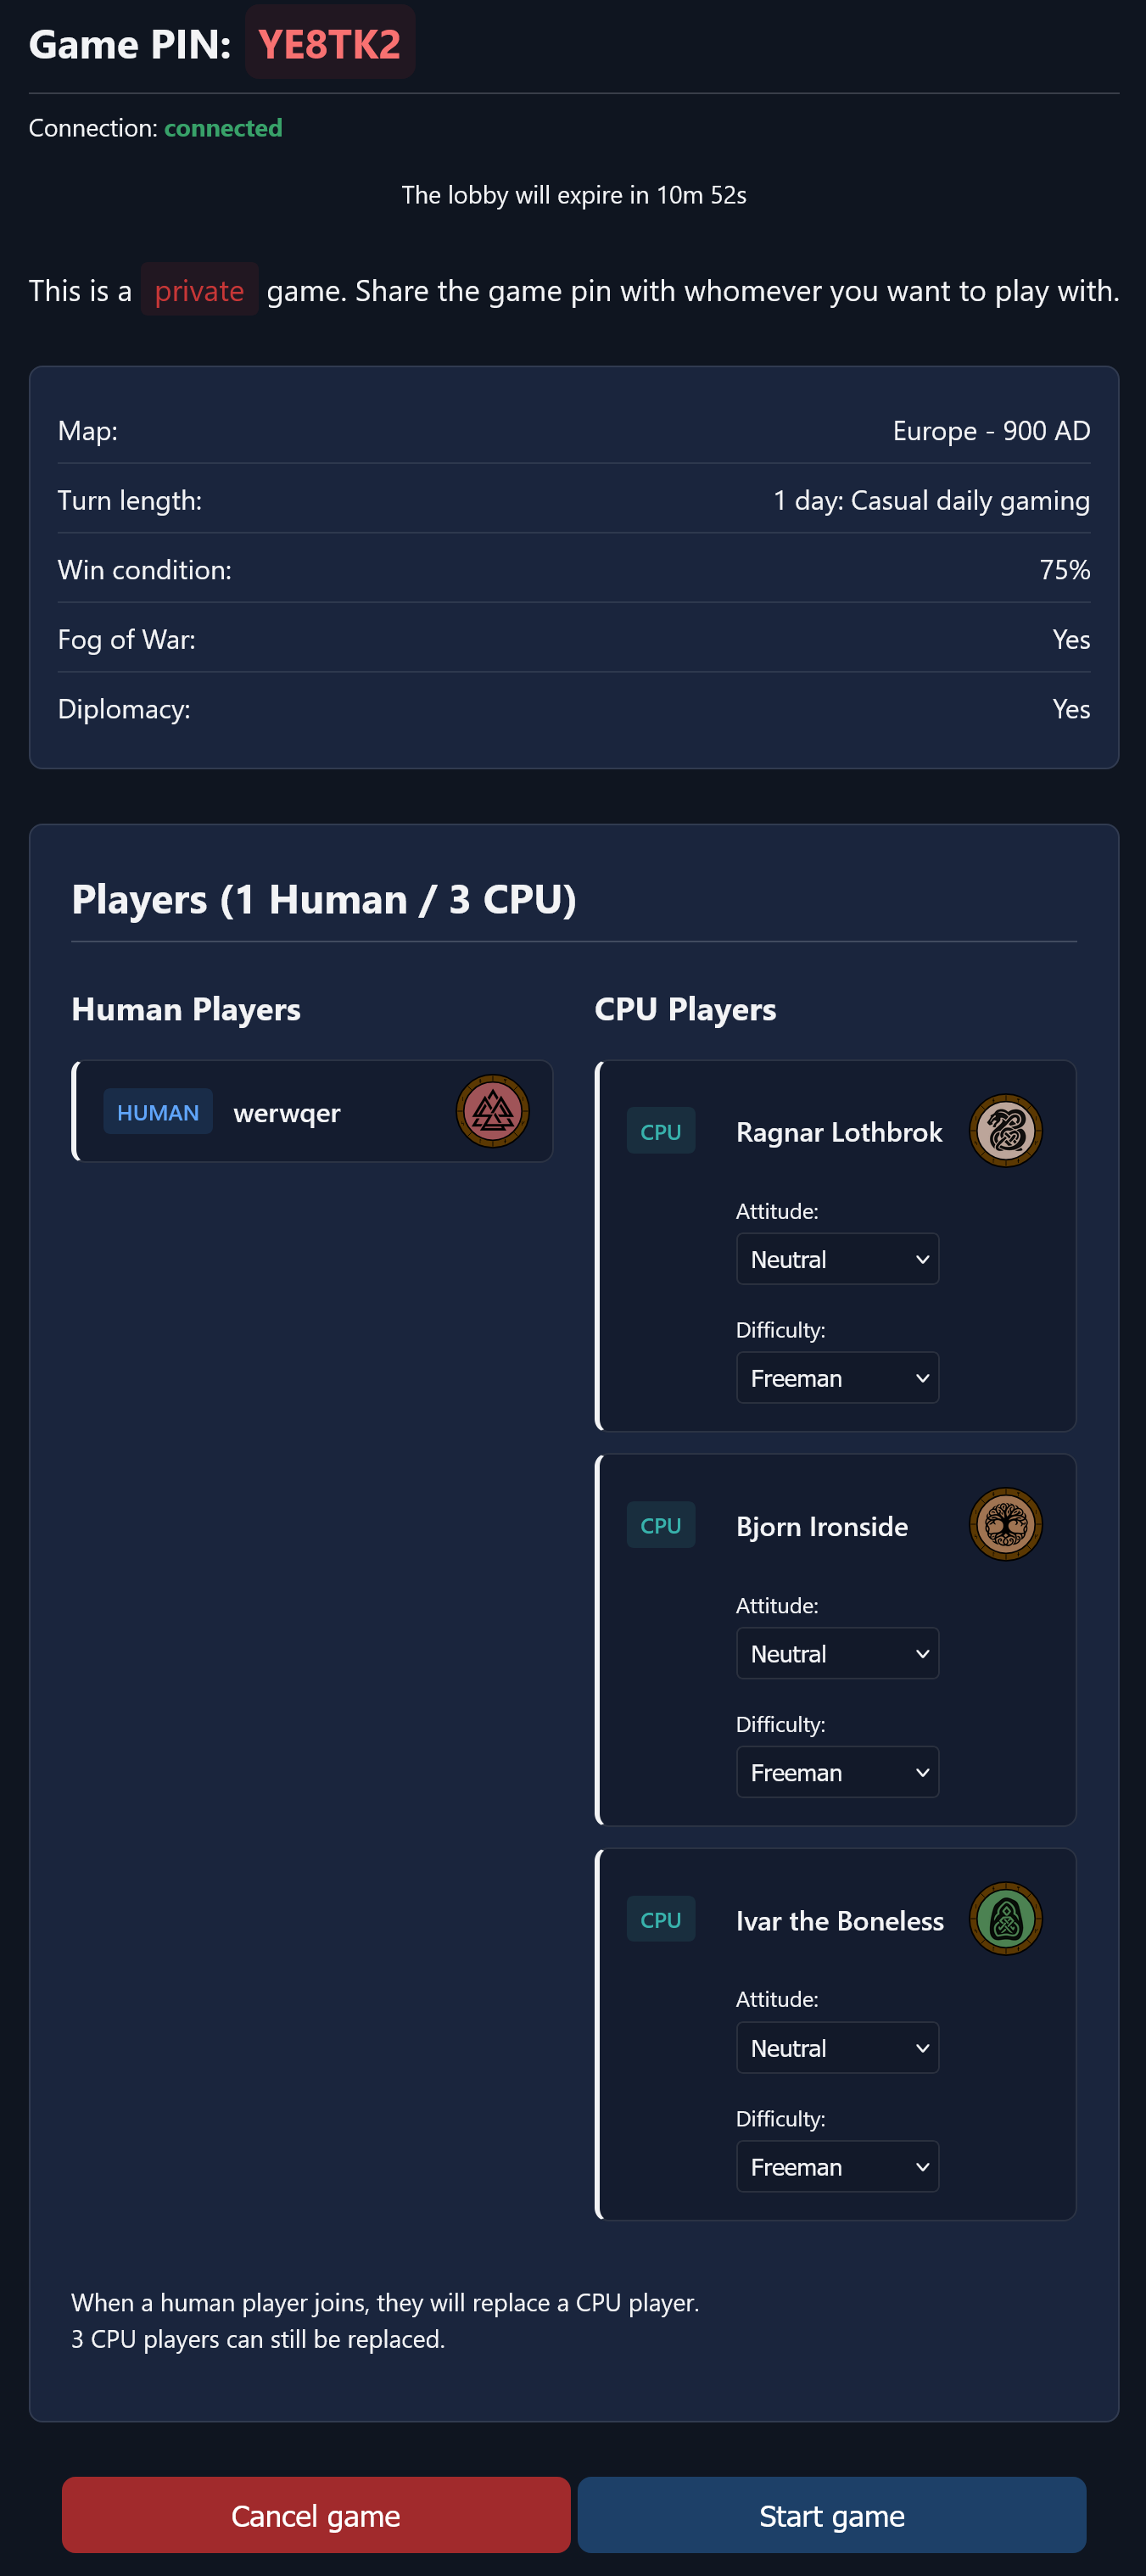
Lobby Management
Sharing Game Pins
When you create a private game, share the game pin with your friends. Clicking the game pin in the lobby will copy a direct link to your clipboard - just paste it in your favorite messenger app!
CPU Settings
As the game owner, you can fine-tune CPU opponents while in the lobby.
You can alter the attitude of each CPU player individually, setting it to either random or choosing a specific value between friendly and hostile. Friendly CPUs tend to be more peaceful and alliance-focused, preferring diplomatic solutions and cooperation over aggressive expansion. Hostile CPUs are more attack-oriented and aggressive, prioritizing military conquest and territorial expansion while being less likely to form or maintain alliances.
Similarly, you can adjust each CPU's difficulty level to create varied challenges across your opponents. Thrall difficulty provides an easier experience with CPUs receiving only 0.5x resource yield, making them less threatening economically and militarily. King difficulty creates a more challenging opponent with 1.5x resource yield, allowing these CPUs to develop faster, field larger armies, and pose a greater strategic threat throughout the game.
Pro tip: Install the game and enable notifications to get alerts when players join your game and during key events, even when your device is in your pocket!
Start or cancel the game
Once you're happy with the game configuration and all players have joined, hit Start game to begin the game. If you change your mind, hit Cancel game to start over with a new game.
Lobby screen
In-game experience
Strategic balance
Success requires balancing territorial expansion with long-term defense. Target regions with high resource yields of the right resources, but ensure you can defend them until your next turn - you only gain resources from territories you control when your turn begins.
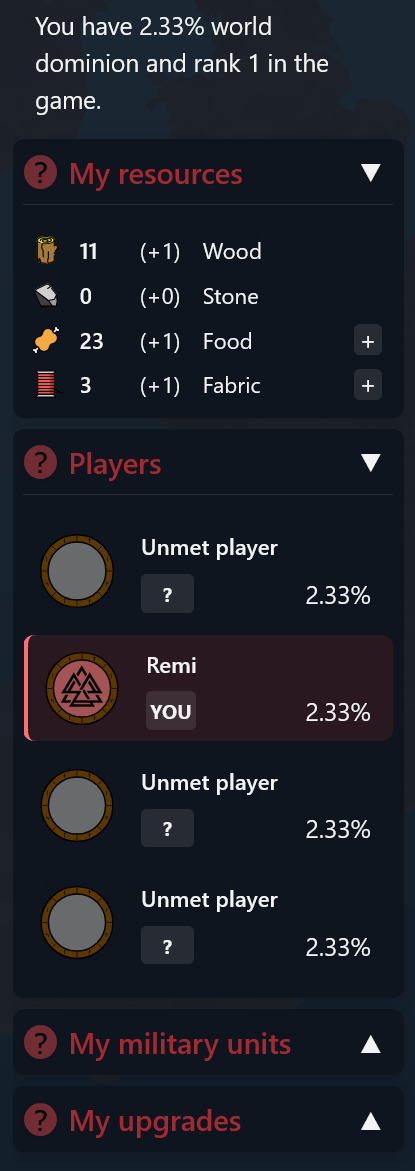
There is an easy way of keeping track of all facets of the game without looking at the map - from your resources and opponents to your units and upgrades.
The sidebar - Your command center
While you don't have to use the sidebar most of the time, it's a great way to keep track of your resources, units and regions - and it's essential for diplomacy.
The sidebar provides current resource availability and per-turn income, letting you see your current resources and your per-turn income at a glance. This helps you plan your next moves and understand your economic capacity.
You need to track your opponents and the players overview in the sidebar shows you all players in the game and your diplomatic status with them. It's through the sidebar you engage in diplomatic negotiations, making it the central hub for all alliance management and political maneuvering.
The unit locations and status section includes a filtering tool and shortcuts to all your units, making it easy to find and deploy your forces. This becomes really useful when you have expanded your empire and need to coordinate multiple armies across vast territories.
If you lose track of where you have your upgrades to build your trolls or longships, the sidebar provides quick access to regions and upgrades, making it easy to locate your specialized military infrastructure when you need it most.
Finally, the sidebar includes game info with shortcuts to game settings and status, your pin codes, and even options to quit the game or invoke ragnarok if you are the game owner.
You can easily collapse the sidebar on mobile devices and desktop when it obstructs your view of the battlefield.
The sidebar
Tactical Considerations
When planning offense and defense, terrain plays a crucial role in your strategic decisions. Shores and islands are particularly vulnerable to longship attacks, as these naval units can bypass land-based defenses and strike where enemies least expect. Similarly, mountainous regions become unsafe against troll assaults, since trolls treat mountains as plains and can approach with surprising speed through terrain that would slow other units.
However, troll attacks tend to be less common due to their slow movement speed across non-mountainous terrain and their high resource cost, making them a significant investment that players use strategically rather than frequently. Understanding that terrain bonuses significantly affect both movement and combat effectiveness is essential - the same unit can perform vastly differently depending on whether it's fighting in favorable or unfavorable terrain.
Beyond terrain and unit considerations, diplomacy adds another layer of tactical complexity to the game. When diplomacy is enabled, you can form alliances with other players that fundamentally change your strategic approach. Allied territories count toward your dominion victory condition, meaning you can win without controlling all the land yourself. However, diplomatic relationships require careful management - you cannot attack players you've proposed alliances to in the same turn, and breaking existing alliances prevents you from attacking that turn while leaving you vulnerable to retaliation. The diplomatic system encourages long-term strategic thinking and can create powerful collaborative victories or devastating betrayals.
Geography
Understanding the landscape
The geography of Viking Dominion directly impacts your strategic options - and it's randomly generated for each game. Each region has a terrain type that affects movement, defense, and available resources. Some units and upgrades require specific terrains or bonuses to be present. Understanding terrain is key to your strategy!
Terrain types & bonuses

Plains
Open land, no special bonuses or penalties. Default terrain if no other bonus is present.

Forest
+50% defense, +1 movement cost. Yields Wood. Can combine with Mountains for Forested Mountains.

Mountains
+100% defense, +2 movement cost. Yields Stone. Can combine with Forests for Forested Mountains.

Forested Mountains
Combines bonuses and penalties of both Forests and Mountains. Rare and valuable for defense.

Fog
Unknown terrain, revealed as you explore. May hide any bonus or penalty.
Resources & categories
Some resources belong to categories. Fish and Game both count as Food. Flax and Wool (from Sheep) both count as Fabric.
Wood
Appears in: Forests (Land, Shore)
Stone
Appears in: Mountains (Land, Shore)
Fish (Food)
Appears in: Fish (Ocean, Shore)
Game (Food)
Appears in: Game (Land, Shore)
Flax (Fabric)
Appears in: Flax (Land, Shore)
Wool (Fabric)
Appears in: Sheep (Land, Shore)
Military units & combat
Drafting military units
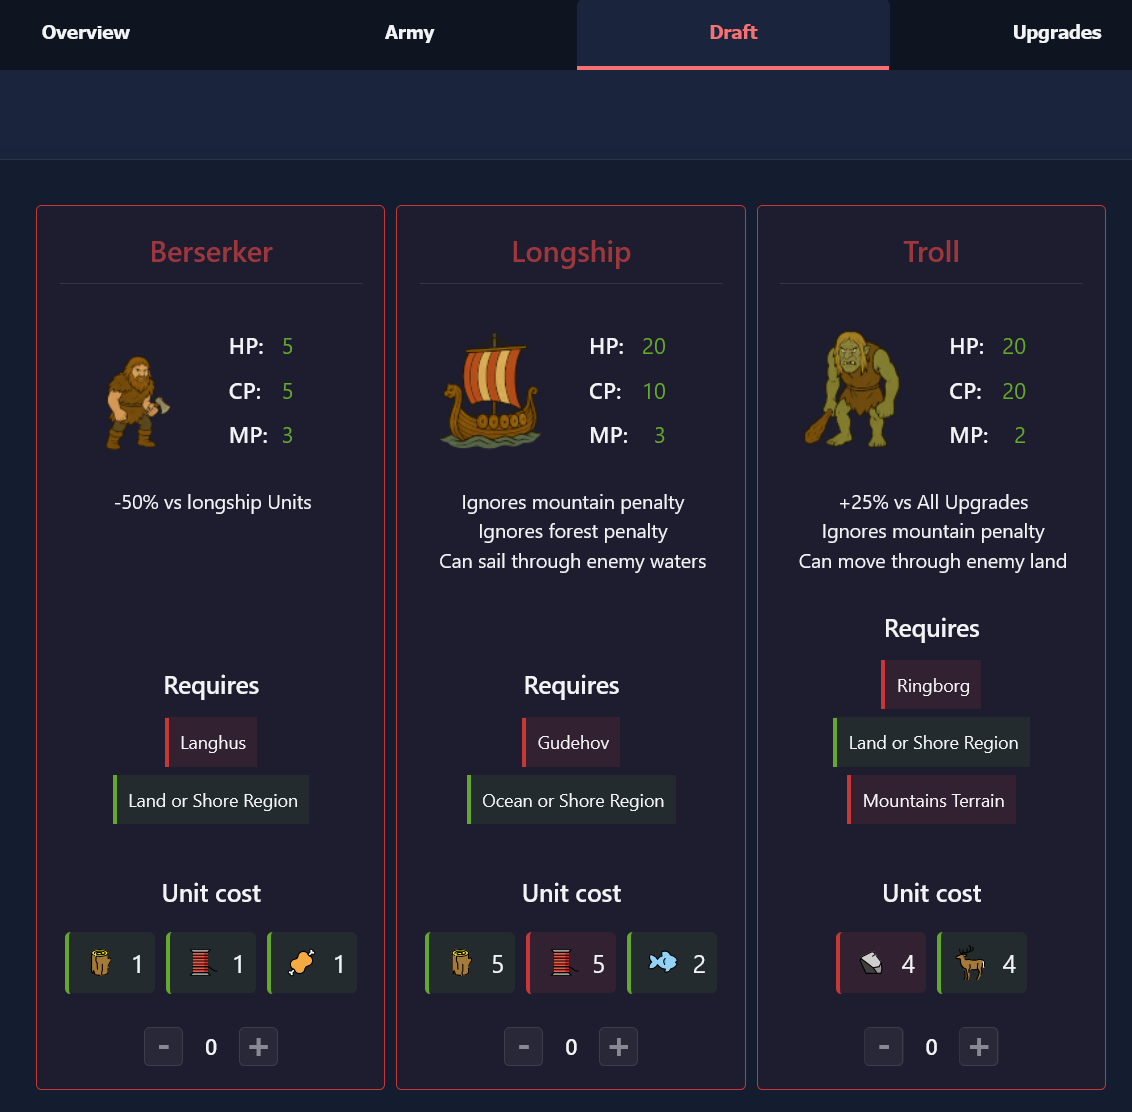
When you have decided you need an army, and you have sufficient resources, start drafting units to expand or defend your territory. Click on a region and go to the draft tab to access the unit creation interface. In this interface, you will quickly see which requirements are fulfilled (green) and not (red).
Unit requirements & capabilities
Berserkers serve as your versatile infantry backbone, buildable anywhere you have constructed a Langhus. They cannot cross seas, and they are particularly weak attacking longships.
Longships require a Gudehov (Temple) for construction and must be built on coastal regions. These naval vessels excel at crossing seas and bypassing enemy lines with their stealth capabilities, allowing for surprise attacks and rapid repositioning across water bodies.
Trolls represent your most powerful but specialized units, requiring a Ringborg (Fortress) built in mountainous regions. While slow across most terrain, they treat mountains as plains and gain a 25% boost against all enemy upgrades, making them formidable siege units despite their high cost and movement limitations.
Unit drafting interface
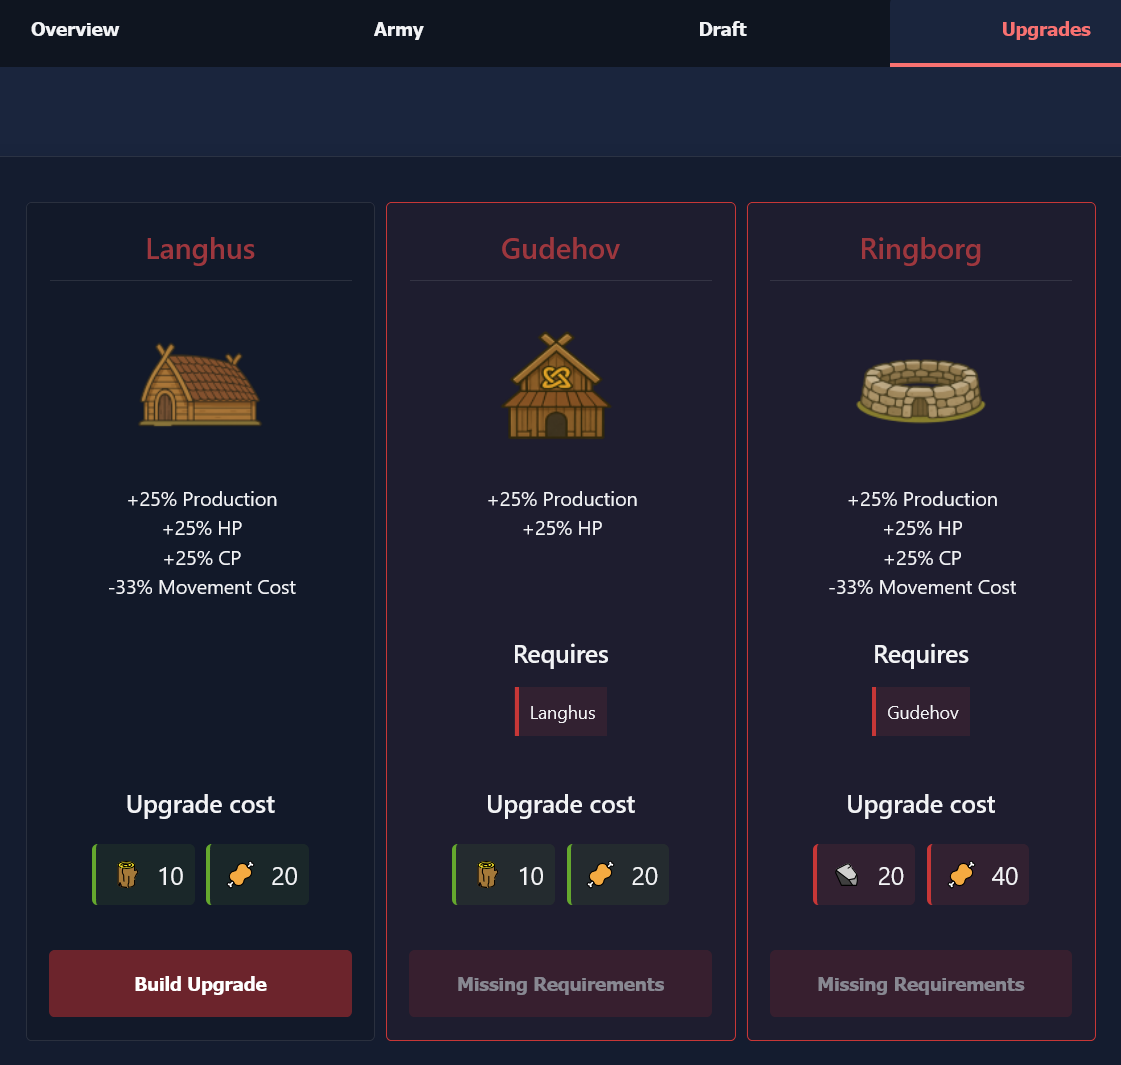
Building upgrades
Before drafting units, you need to build the necessary upgrades to unlock their production capabilities. Each upgrade serves a specific military purpose and builds upon the previous tier. You go to the upgrades screen by clicking on a region, and selecting the Upgrades tab.
The Langhus (Longhouse) forms the foundation for all military production in your territories. This essential upgrade must be built before you can train any military units, making it your first priority when establishing new settlements or expanding your military capabilities. It boosts your defensive units and reduces friendly movement cost through the region.
The Gudehov (Temple) unlocks longship construction, allowing you to build these crucial naval units on any coastal region where you've established this upgrade. This religious and military structure represents your mastery of seafaring technology.
The Ringborg (Fortress) enables troll domestication in mountainous regions and provides maximum defensive bonuses to your territories. This massive fortification gives a defensive boost to your defensive units and represents the pinnacle of your military infrastructure, housing the most powerful units in your arsenal. It also reduces friendly movement cost in the region.
Region upgrades
Movement & combat
To move units, you need to first select which forces you want to deploy. Click on any region containing your units to access the army management interface. This will open the region panel where you can see all available units stationed in that territory.
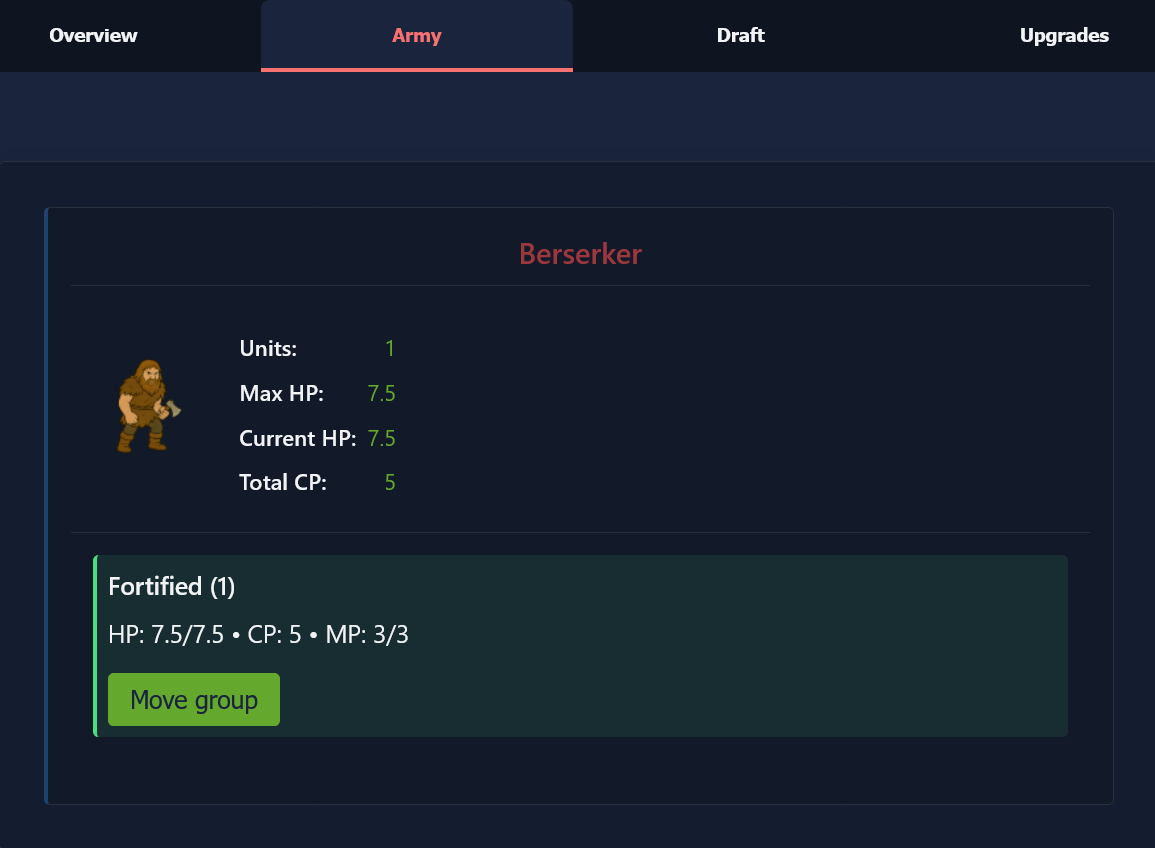
Once you've accessed the region, navigate to the army section and select the specific unit types and quantities you want to move. The interface shows you exactly how many of each unit type you have available, along with their current health status. You can choose to move all units of a type or split your forces by selecting only a portion of your army.
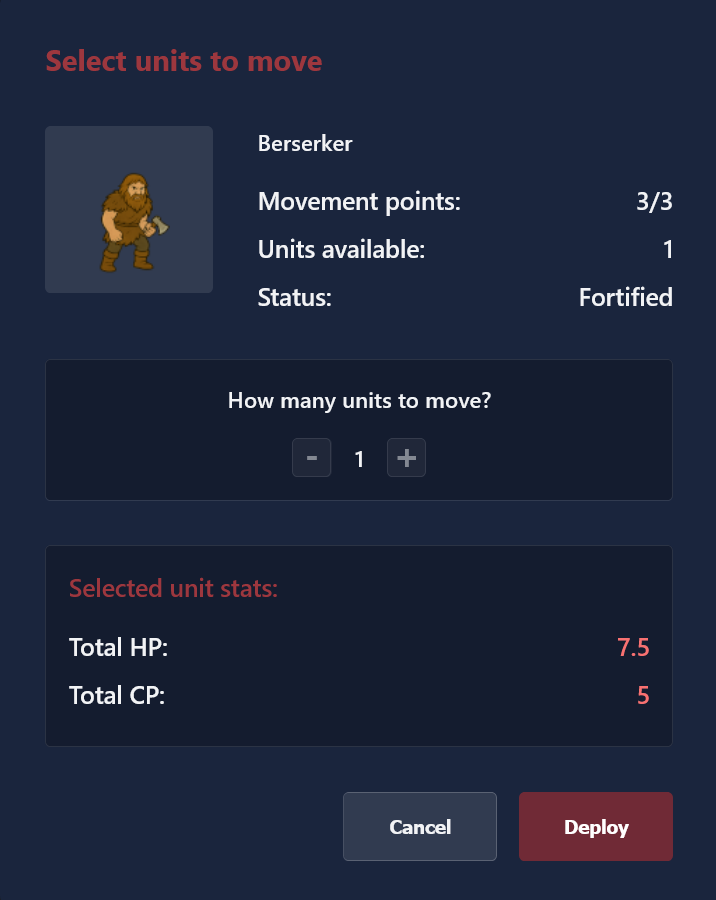
After selecting your units, the map will dynamically highlight all possible destinations based on your chosen forces' movement capabilities. This visual system makes it immediately clear where you can move and what type of action each destination represents.
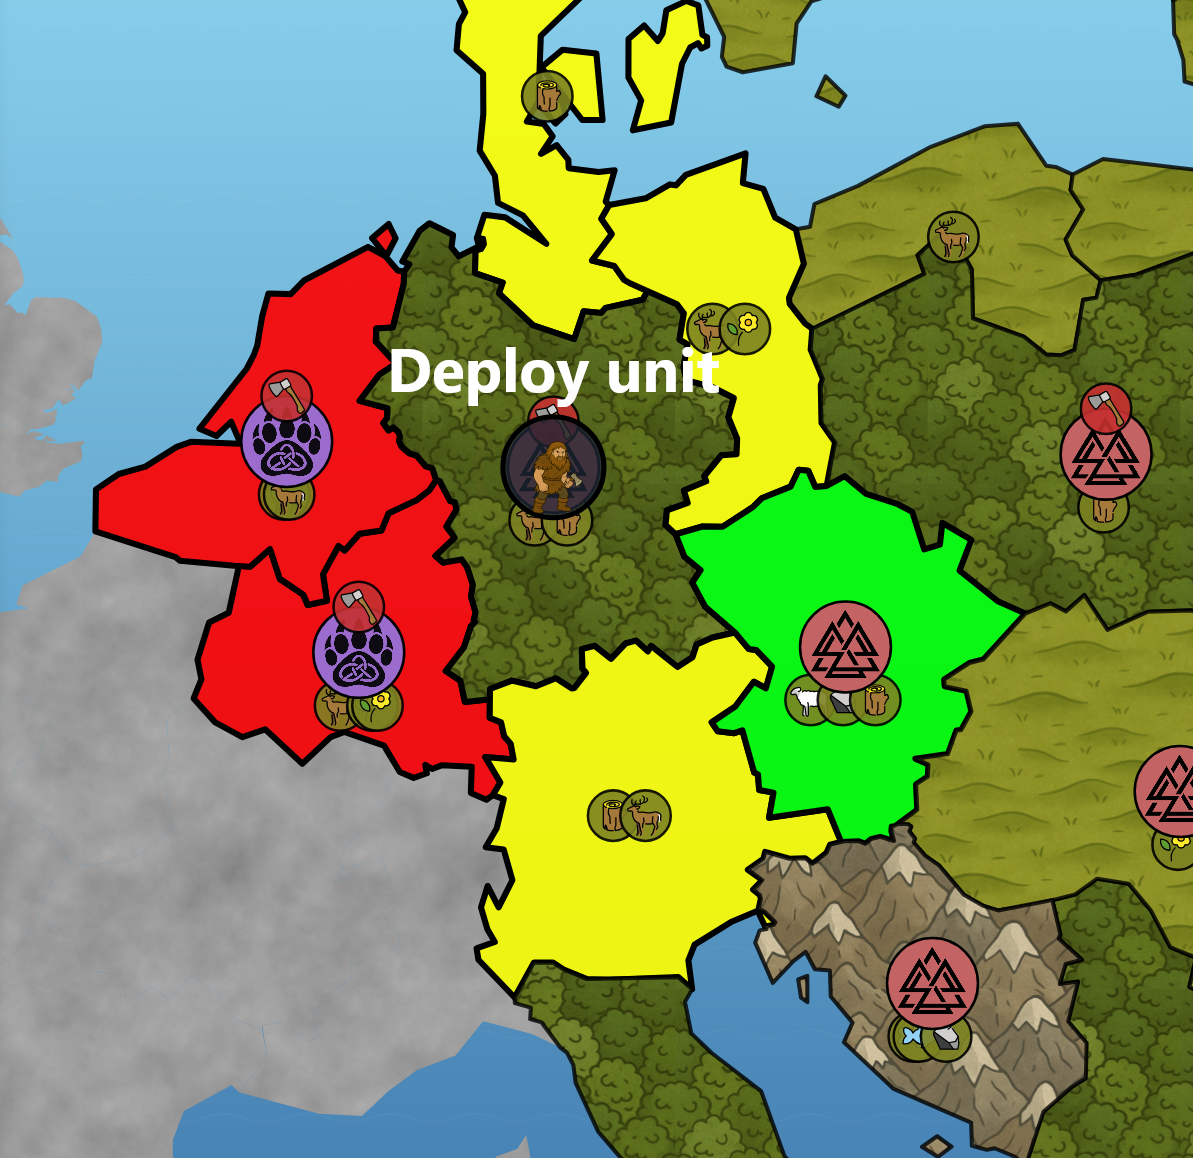
The color-coded highlighting system provides instant strategic information. Yellow regions represent neutral territory that you can occupy without resistance, expanding your dominion peacefully. Red regions indicate enemy territory where moving your units will initiate combat against the defending forces. Green regions show your own territories, allowing you to reposition units for better strategic positioning or defensive arrangements. Understanding this color system is crucial for planning effective military campaigns and avoiding unintended conflicts.
Sieges & battles
When you move units into enemy territory, you don't immediately capture it. Instead, this creates a siege situation, visually marked on the map by a fiery Gjallarhorn symbol. This siege mechanic allows for strategic planning and gives the attacker time to prepare for the upcoming battle.
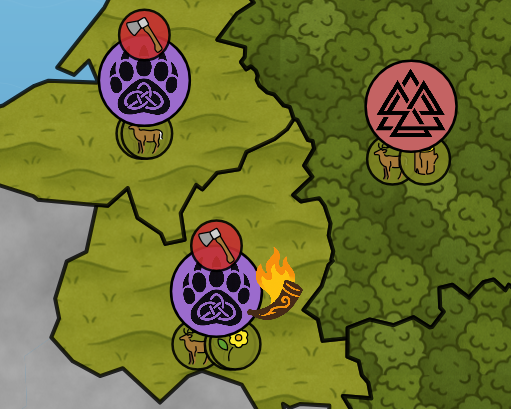
The siege phase gives you tactical flexibility - you can reinforce your attacking forces with additional units from the same region or even send reinforcements from different territories. This allows you to build up overwhelming force before committing to battle, but remember that all reinforcements must arrive during the same turn, and you must either attack or withdraw the siege before the next turn. If you withdraw, no harm has been done to your reputation.
When the battle finally resolves, you'll see a detailed combat report showing the outcome. This screen provides crucial information about casualties, unit performance, and the overall result of your military engagement.
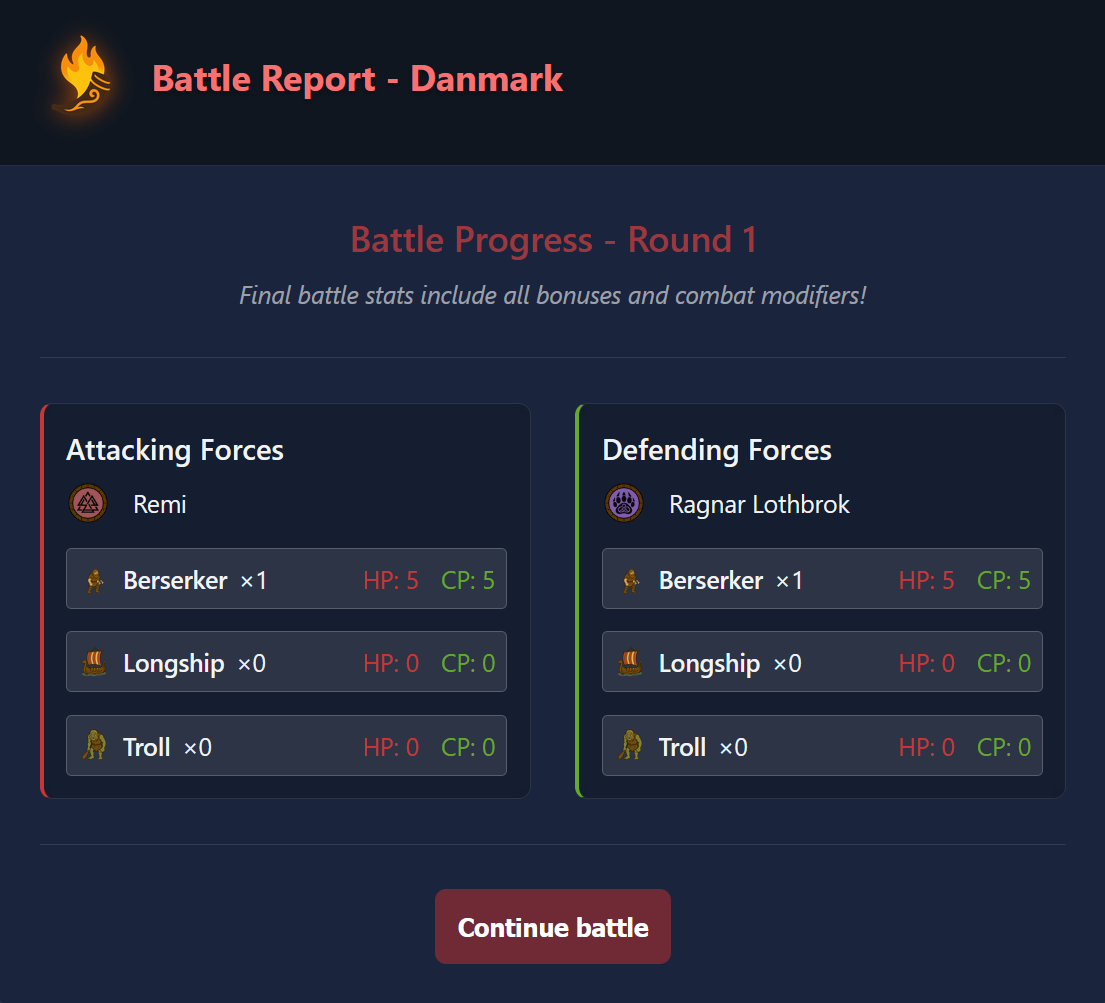
Battle outcomes
Understanding battle outcomes is crucial for military planning. If you suffer a defeat, all your attacking units are completely lost, making failed assaults extremely costly. However, achieving victory doesn't mean your units escape unscathed - they may be damaged and require time to heal before they can fight at full effectiveness again.
The healing process restores 1 HP per turn plus any bonuses from upgrades until units reach full health. During this recovery period, damaged units are less effective in combat. After attacking, units face a movement restriction - they cannot move again in the same turn, so position them carefully.
There's one important exception to the movement restriction: units that successfully capture neutral territory may continue moving in the same turn. This applies to longships and trolls, allowing them to chain together multiple territorial gains and create devastating breakthrough campaigns across neutral regions.
Pro tip: If a human player quits or misses the turn deadline, all regions controlled by that player will be released and considered neutral the following turn. This creates massive expansion opportunities for players with mobile units!
Diplomacy
Diplomatic overview
Sometimes victory requires allies, and the diplomacy system in Viking Dominion provides tools for forming strategic partnerships with both human and CPU players. When diplomacy is enabled in your game, you gain access to alliance mechanics that can fundamentally alter your path to victory.
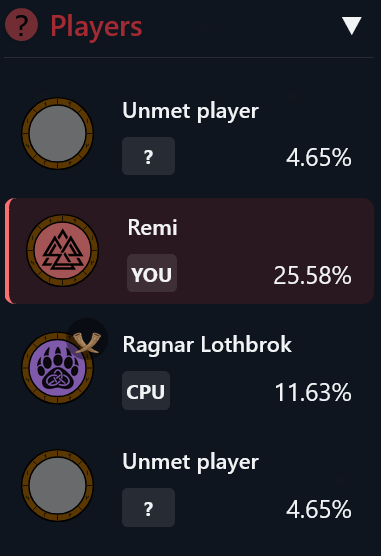
The Gjallarhorn symbols in the player section serves as your diplomatic indicator, showing both availability and current status between you and other players. This visual cue helps you quickly identify potential allies, current partnerships, and diplomatic opportunities at a glance.
Gjallarhorn variants
The diplomatic Gjallarhorns provide instant visual feedback about your diplomatic status with other players:
- No horns: No diplomacy is possible because you haven't met yet, or diplomacy is disabled in this game.
- Bronze horns: Neither friend nor foe. You may propose an alliance to this player, and they to you.
- Golden horns: You are allies. There is a non-aggression pact between you and this player, which you or they can break and attack the next round.
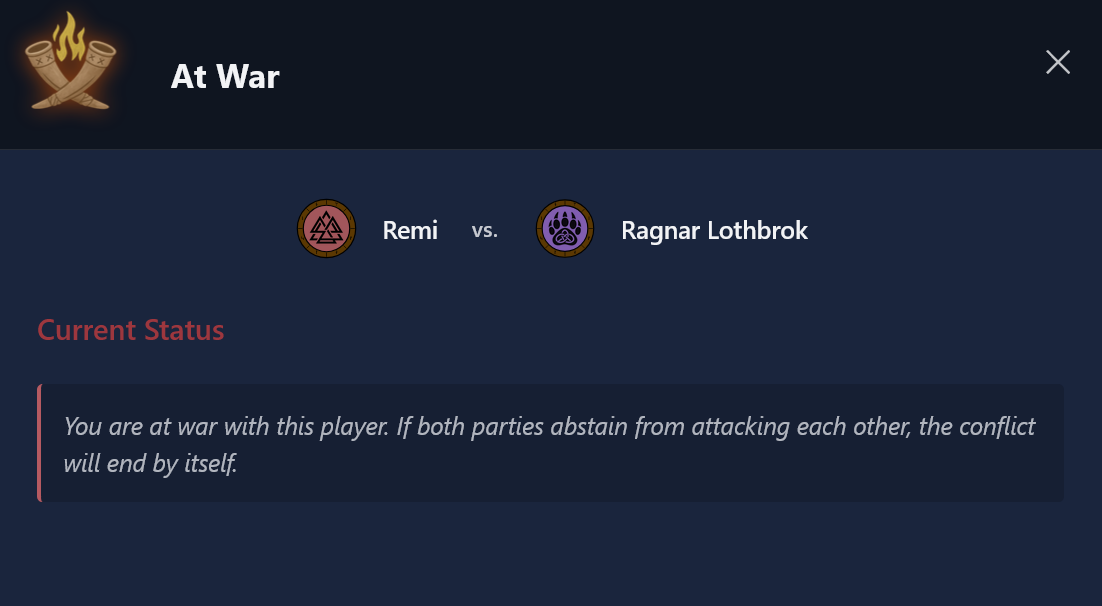
- Fiery horns: You are at war with this player. No diplomacy is possible at the moment.
These symbols update in real-time as diplomatic relationships change, helping you quickly assess the political landscape and identify potential allies or threats.
Alliance benefits & strategic implications
Forming alliances creates powerful shared victory conditions where allied territories count toward your dominion goal, meaning you can achieve victory without personally controlling the required percentage of the map. This opens up entirely new strategic approaches, allowing you to focus on supporting your allies' expansion rather than competing directly with them.
Alliances also establish non-aggression pacts that prevent allies from attacking each other, creating safe borders that allow you to focus your military efforts elsewhere. Additionally, you gain extended visibility through allied territories, revealing more of the map and providing valuable intelligence about enemy movements and positions.
However, alliances come with important limitations. There are no joint military operations - you cannot move through allied territory or coordinate direct attacks together. Each ally must manage their own military campaigns independently, which requires careful coordination through diplomatic communication rather than tactical integration.
Managing diplomatic relationships
The diplomatic interface provides tools for managing your relationships with other players. You can propose alliances, respond to incoming proposals, and monitor the diplomatic status with each player. You can access the diplomatic interface via the sidebar, clicking on the player you want to interact with.
Understanding diplomatic timing is crucial for effective alliance management. You cannot attack players you've asked to be allies with in the same turn - this prevents aggressive players from using alliance proposals as a deceptive tactic. If you want to attack someone who has proposed an alliance to you, you must first refuse their proposal before launching any military action.
Breaking existing alliances carries significant consequences - it prevents you from attacking that same turn, giving your former ally a window to retaliate while you're vulnerable. However, your former ally faces no such restriction and can immediately launch attacks against you. This asymmetry makes alliance-breaking a risky strategic decision that requires careful timing.
CPU players have sophisticated diplomatic memory systems - they remember hostile actions and alliance-breaking behavior, making it increasingly difficult to form new partnerships after betrayals. Additionally, recent conflicts create cooling-off periods where alliance proposals are impossible until several rounds pass, preventing rapid diplomatic flip-flopping.
Victory strategy: If allied with only one player, you'll share victory when either of you reaches the dominion threshold. To win alone while using alliances strategically, ally with multiple players who aren't allied with each other, creating a unique alliance set that gives you the largest combined territory control.
Final tips & game management
End game options
Even the most determined Viking warriors sometimes face situations where ending the game becomes necessary, whether due to strategic defeat or external circumstances. The game provides several options for graceful exits and emergency game management.
The most honorable choice is to play on and fight to the bitter end - this is the mark of a true Viking! Even when facing overwhelming odds, continuing to resist can provide valuable strategic experience and sometimes leads to unexpected comeback opportunities through diplomatic shifts or enemy mistakes.
If you find your position truly hopeless or need to leave due to real-world commitments, you can quit the game entirely. This removes you from the current match, and if you happen to be the last human player remaining, the entire game will end automatically. Your departure may also trigger diplomatic changes as your territories become neutral.
Game owners have access to a nuclear option called Ragnarok, which immediately ends the game for all players. This drastic measure provides final rankings based on current territorial control but declares no winner. Ragnarok should only be used in exceptional circumstances, such as when technical issues make the game unplayable or when all players agree to end early.
Game ownership transitions happen automatically to maintain game stability. If the original game owner quits but human players remain active, ownership transfers to another human player, ensuring continued access to game management features and preventing administrative abandonment.
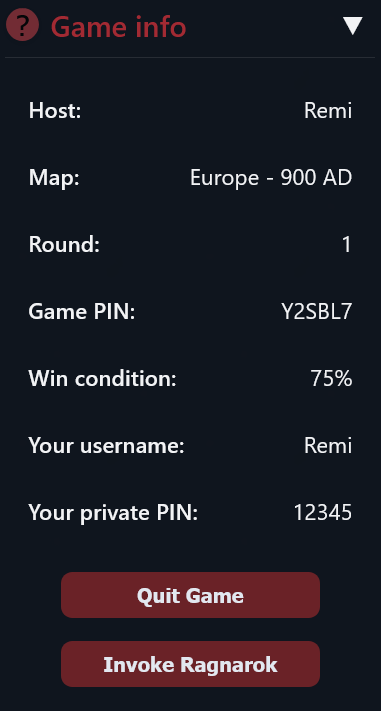
Game information panel
Cross-device flexibility
Viking Dominion's cross-device capabilities provide unmatched flexibility for modern strategic gaming. Your player name and pin code serve as your Viking identity, allowing seamless transitions between devices without losing progress or position in ongoing games.
This flexibility enables sophisticated multi-device strategies: create and join games on mobile for convenience and quick responses, then switch to desktop when you need the larger screen for detailed strategic planning and complex diplomatic negotiations. The transition is instant and preserves all your game state, unit positions, and diplomatic relationships.
All the information needed to resume your games is always accessible through the sidebar's game info section, including the game pin, your name and your personal pin code. Games can always be resumed from the Viking Dominion front page.